Understanding Lap Joint Flanges
Key components of lap joint flanges:
- Flange Ring: The external part that distributes pressure and bolt load.
- Stub End: Welded to the pipe; provides fluid contact and corrosion resistance.
- Bolts and Nuts: Hold the flange assembly together and compress the gasket to create a leak-proof seal.
- Gasket: Sits between flange faces to prevent leakage.
The effectiveness of lap joint flanges depends heavily on proper bolt tension, bolt sequence, and torqueing techniques.
Importance of Proper Torqueing
Torqueing refers to the application of a specific rotational force to a bolt to achieve the desired clamping force. Correct torque ensures:
- Uniform gasket compression
- Even distribution of stress across flange faces
- Prevention of leaks and flange deformation
- Extended service life of flange and bolts
Incorrect torqueing can result in several issues:
- Under-Tightening: Leads to gasket leaks, bolt loosening, and potential pipeline failure.
- Over-Tightening: Causes flange deformation, bolt stress, and gasket damage.
Bolt Tightening Methods
Several methods are used to tighten bolts on lap joint flanges, depending on application, bolt type, and desired accuracy.
Hand Wrench Method
- Description: Basic method using a standard wrench.
- Use Case: Low-pressure systems with small flanges (≤ 4 inches).
- Limitations: Difficult to achieve consistent torque; prone to human error.
Torque Wrench Method
- Description: Applies precise bolt tension with a calibrated torque wrench.
- Use Case: Fits moderate to high-pressure application requirements.
- Advantages: Accurate, repeatable, reduces risk of under- or over-tightening.
Hydraulic or Pneumatic Torque Tools
- Description: Powered torque tools for large bolts or high-pressure flanges.
- Use Case: Large-diameter flanges, high-pressure pipelines, critical industrial applications.
- Advantages: High torque capacity, consistency, reduces manual labor.
Turn-of-Nut Method
- Description: Tighten bolts to a snug condition, then rotate each nut a specific angle (usually 60°–90°) to achieve the desired preload.
- Use Case: High-pressure or critical systems where torque alone may be insufficient.
- Advantages: Ensures uniform bolt load, accounts for friction variations.
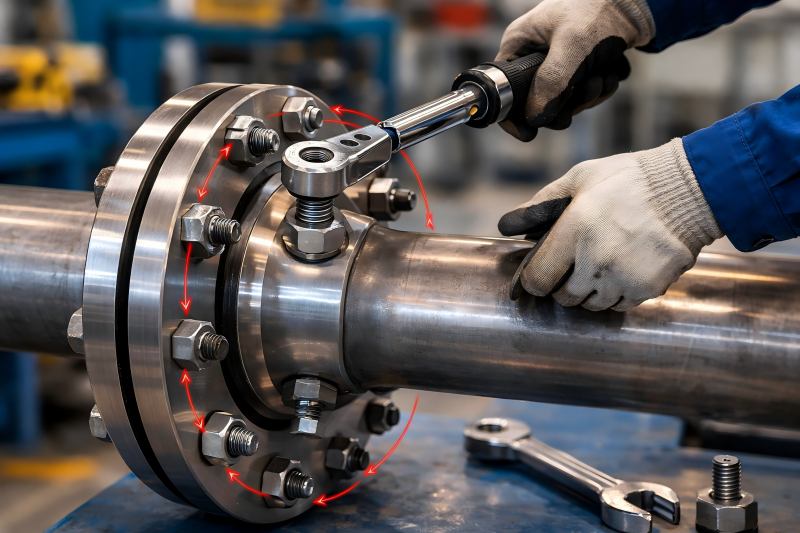
Bolt Tightening Sequence
Correct bolt sequence ensures even gasket compression and flange stress.
Recommended Steps:
- Insert all bolts and nuts loosely.
- Tighten bolts in a cross-pattern (star sequence).
- Tighten bolts gradually in stages: 30%, 60%, then 100%.
- Verify and adjust bolt torque once system is at temperature.
Example Bolt Tightening Sequence for 8-Bolt Lap Joint Flange
| Pass | Torque % | Bolt Sequence (Star Pattern) |
| 1 | 30% | 1 → 5 → 3 → 7 → 2 → 6 → 4 → 8 |
| 2 | 60% | 1 → 5 → 3 → 7 → 2 → 6 → 4 → 8 |
| 3 | 100% | 1 → 5 → 3 → 7 → 2 → 6 → 4 → 8 |

Calculating Torque Values
Correct torque depends on bolt size, flange diameter, gasket type, and operating pressure. Manufacturers usually provide torque tables for standard flanges.
Typical Torque Values for Lap Joint Flanges (ANSI B16.5)
| Flange Size (NPS) | Bolt Diameter | Torque Range (Nm) |
| 2” – 3” | 5/8” | 40 – 50 |
| 4” – 6” | 3/4” | 80 – 100 |
| 8” – 10” | 7/8” | 150 – 180 |
| 12” – 16” | 1” | 250 – 300 |
| 18” – 24” | 1 1/8” | 400 – 450 |
Note: Always consult the flange and gasket manufacturer for exact torque values.
Gasket Considerations in Torqueing
The type and thickness of the gasket affect bolt tension and torque requirements:
- Full-Face Gaskets: Spread bolt load over entire flange face; often require moderate torque.
- Ring-Type Gaskets: Focus pressure on seal; tighten accurately to prevent damage.
- Soft Gaskets (PTFE, Rubber): Sensitive to over-tightening; use torque wrenches for accuracy.
- Metallic Gaskets: Higher torque required; may use turn-of-nut method.
Gasket Torque Adjustment Recommendations
| Gasket Type | Torque Adjustment | Notes |
| Full-Face Non-Asbestos | Standard torque | Moderate pressure |
| Spiral Wound | +10–15% | High-pressure applications |
| PTFE | -10–15% | Avoid over-compression |
| Ring Type Joint | Standard + Turn-of-Nut | Critical sealing |
Pre-Tightening vs. Final Tightening
Pre-Tightening: Initial torque applied to secure bolts without compressing the gasket fully. Ensures proper alignment and prevents flange rotation.
Final Tightening: Achieves the target torque, compresses gasket, and ensures leak-proof sealing. Usually done in multiple passes with a star pattern.
Tips:
- Never tighten one bolt fully before others are pre-tightened.
- Always follow incremental torqueing to avoid uneven stress.
Special Considerations for Lap Joint Flanges
- Rotation: The flange can rotate over the stub end. Ensure the flange is positioned correctly before final tightening.
- Lubrication: Lightly lubricate bolts to reduce friction and improve torque accuracy.
- Temperature Compensation: Bolt tension can change with operating temperature. Recheck torque after heating or cooling cycles.
- Bolt Stretch and Yield: Avoid exceeding bolt yield strength; follow manufacturer torque tables to prevent permanent deformation.
Common Mistakes and How to Avoid Them
Torqueing Mistakes in Lap Joint Flanges
| Mistake | Effect | Corrective Action |
| Uneven Torque | Gasket leaks, flange bending | Use torque wrench, follow star pattern |
| Over-Tightening | Bolt deformation, flange damage | Apply manufacturer-recommended torque |
| Under-Tightening | Leaks, bolt loosening | Incremental torqueing in multiple passes |
| Ignoring Bolt Lubrication | Inaccurate torque | Apply appropriate lubrication |
| Skipping Re-Torque After Heating | Loss of preload | Recheck torque after operating temperature |
| Using Wrong Gasket | Leakage or failure | Select gasket compatible with pressure and fluid |
| Bolt Pattern Ignored | Uneven stress | Follow cross-pattern sequence |
Recommended Tools for Bolt Tightening
- Manual Torque Wrench: Suitable for small to medium flanges.
- Hydraulic Torque Wrench: For large flanges or high-pressure systems.
- Digital Torque Wrench: Provides precise, readable torque values.
- Torque Multipliers: Help achieve high torque without excessive manual effort.
Tool Selection Guide
| Flange Size | Recommended Tool | Notes |
| ≤ 4” | Manual Torque Wrench | Small bolts, low-pressure system |
| 4” – 12” | Digital Torque Wrench | Moderate torque, precise control |
| ≥ 12” | Hydraulic Torque Wrench | High torque, heavy bolts |
| Critical / High Pressure | Torque Multipliers | Ensure accuracy, reduce fatigue |
Maintenance and Re-Torqueing
Proper maintenance ensures long-term performance:
- Inspect bolts, nuts, and flange faces regularly.
- Check for loosening or corrosion.
- Replace worn gaskets and bolts as needed.
Recommended Maintenance Schedule
| Interval | Task |
| After Initial Installation | Re-torque all bolts |
| Quarterly | Inspect flange for leaks or corrosion |
| Annually | Replace gaskets, inspect bolts and flange integrity |
| After Thermal Cycling | Recheck bolt torque and flange alignment |
Torqueing and bolt tightening are crucial for the reliable operation of lap joint flanges. Proper techniques ensure uniform gasket compression, prevent leaks, and maintain flange integrity under pressure. Key takeaways include:
Use the correct torque method for the flange size and system pressure.
Follow cross-pattern bolt tightening and incremental torqueing.
Select appropriate gaskets and adjust torque as needed.
Check bolts after thermal cycles or startup.
Ensure correct torque and lubrication.
By implementing these practices, engineers can ensure the long-term safety, reliability, and efficiency of lap joint flange systems across industries such as water treatment, chemical processing, oil & gas, and pharmaceuticals.