
Threaded flanges are popular in piping systems for their simple installation, offering an advantage over welded flanges as they don’t require welding.
Proper installation is critical to ensure the strength and integrity of the connection, preventing leaks and maintaining the safety and efficiency of the system.
What Are Threaded Flanges?
Threaded flanges are mechanical components used to connect piping systems without the need for welding. They can be screwed straight onto the pipe thanks to their internal threads. This feature makes threaded flanges ideal for temporary installations, systems that need to be disassembled, or situations where welding is not an option due to safety concerns or accessibility.
Threaded flanges are often used in low-pressure systems, where the risk of leakage is minimal, but their ease of use and versatility make them a preferred choice for various industries.
Types of Threaded Flanges
- Class 150 Threaded Flange: Ideal for standard pressure systems and general applications.
- Class 300 Threaded Flange: Suitable for systems that require medium pressure handling.
- Class 600 Threaded Flange: Best used in high-pressure systems, offering robust performance.
- Stainless Steel Threaded Flange: Used in corrosive environments such as chemical plants or food processing industries.
Tools and Materials Needed
Before beginning the installation of threaded flanges, it’s essential to gather the right tools and materials to ensure a smooth and effective process.

Tools:
- Wrenches: To tighten and loosen bolts.
- Torque Wrench: To apply precise torque to the bolts during tightening.
- Pipe Cutter or Saw: For cutting the pipe to the required length, if needed.
- Pipe Threading Tool: For preparing the pipe ends, if not pre-threaded.
- Cleaning Brush or Cloth: To remove dirt, debris, and old sealant from the pipe and flange faces.
Materials:
- Thread Sealant or Teflon Tape: Applied to improve the seal between the pipe and flange, minimizing the risk of leaks.
- Bolts and Washers: Essential for securely fastening the flange to the pipe.
- Nuts: To tighten the bolts and secure the flange in place.
Safety Gear:
- Gloves: Providing protection for your hands against sharp edges and debris.
- Safety Goggles: To protect your eyes while cutting or handling the materials.
- Steel-Toed Boots: To ensure foot protection while working.
Preparing the Piping System for Installation
The first step in installing threaded flanges is to prepare the piping system for connection. In addition to reducing the possibility of leaks or an incorrect fit, thorough preparation guarantees a seamless installation process.
Inspect the Pipe Threads
Before installing the threaded flange, inspect the threads on the pipe to ensure they are clean, undamaged, and properly cut. Threaded pipes should have well-formed threads to allow the flange to screw on without resistance. Any damage to the threads can cause misalignment or leakage.
Clean the Pipe Ends
The pipe ends where the flange will be installed should be cleaned thoroughly to remove any dirt, debris, or old thread sealant. Use a cleaning brush or cloth to ensure that the area is free from contaminants that could affect the seal and cause leaks.
Ensure Proper Alignment
Before attaching the flange, check the alignment of the pipe and flange. For a flawless fit, the pipe must line up with the flange’s center. Inadequate sealing or even flange failure may result from any misalignment.
Step-by-Step Installation Process
Now that the pipe and flange are prepared, follow these steps for a successful threaded flange installation:
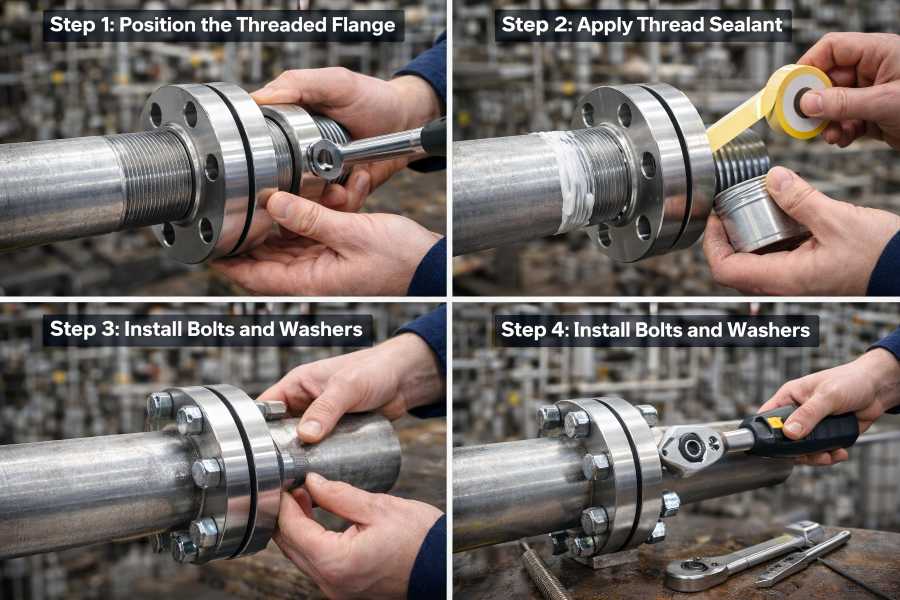
Step 1: Position the Threaded Flange
Start by aligning the threaded flange with the pipe. Make sure the pipe’s threads and the flange’s internal threads line properly. Make sure the flange does not cross-thread when you gently screw it onto the pipe. If necessary, use a wrench to carefully rotate the flange until it’s snug against the pipe.
Step 2: Apply Thread Sealant
Thread sealant is applied to the threads to help prevent leaks and ensure a secure connection. Use either thread sealant paste or Teflon tape, depending on your preference and the type of material being used.
- For Thread Sealant Paste: Apply a thin, even layer of paste around the male threads of the pipe. Be cautious not to use excess paste, as it may seep out during installation and create a mess.
- For Teflon Tape: Make sure the entire threaded section is covered by wrapping the tape in a clockwise fashion around the pipe’s male threads. Avoid overlapping the tape too much, as it can cause excessive tightness.
Step 3: Install Bolts and Washers
Place the flange onto the pipe, ensuring it is positioned correctly. Insert bolts and washers through the bolt holes on the flange. The washers should be positioned between the bolts and the flange to distribute the pressure evenly. This prevents damage to the flange and pipe during tightening.
Step 4: Tighten the Bolts
To ensure that the flange is properly placed, start by manually tightening the bolts. Next, tighten the bolts using the torque wrench in accordance with the recommended torque parameters provided by the manufacturer. While under-tightening might cause leaks, over-tightening can harm the flange.
Testing and Inspection
After completing the installation, it’s crucial to perform thorough testing and inspection to ensure the connection is secure and leak-free.
Pressure Testing
To find any leaks near the threaded flange connection, perform a pressure test. Increase the system’s pressure gradually while keeping an eye out for any leaks on the flange. If leaks are discovered, tighten the bolts even further or check the sealant to make sure it was applied correctly.
Final Inspection
Perform a final visual inspection to ensure the flange is properly aligned and securely tightened. Verify that all bolts are in place and the gasket is seated properly to provide a leak-free seal.
Common Mistakes to Avoid
While installing threaded flanges is a straightforward process, several common mistakes can compromise the integrity of the connection. Be mindful of the following:
Over-Tightening or Under-Tightening Bolts
Excessive tightening can damage the flange, whereas insufficient tightening can lead to loose joints and leakage. Always follow the manufacturer’s torque specifications.
Incongruity
Leaks or flange failure may result from uneven tension on the connection caused by misalignment of the pipe and flange. Prior to tightening, make sure the pipe and flange are precisely aligned.
Applying Sealant Incorrectly
Leaks may result from improper thread sealant application. Apply the sealant evenly and with the proper type and quantity.
Maintenance Tips for Threaded Flanges
Threaded flanges require regular maintenance to ensure continued performance and safety.
Frequent Inspections
Periodically check threaded flanges for damage, wear, or corrosion. Check for any leakage around the flange and replace gaskets as needed.
Tighten bolts again
Bolts may become loose over time as a result of temperature cycling or vibration. Periodically check the tightness of bolts and re-tighten them as necessary.
Clean and Replace Gaskets
Gaskets can deteriorate over time. Ensure that they are replaced during maintenance to maintain a leak-free seal.