Forging is a key metalworking process in aerospace, automotive, energy, and heavy machinery industries, producing high-strength, reliable parts.
Despite technological advances, defects still occur, impacting performance, cost, and delivery, making root-cause understanding essential for quality control and process optimization.
1. Cracks
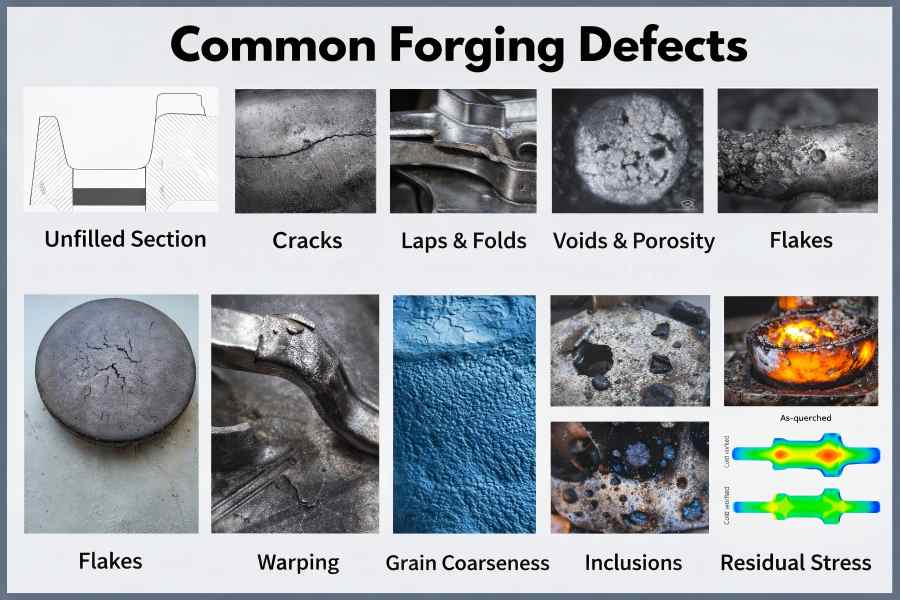
Cracks are among the most serious forging defects. They may appear on the surface or deep within the material and often serve as initiation points for failure under load. Surface cracks are visible without special tools, while internal cracks require nondestructive testing to detect.
Typical Signs:
- Fine lines or visible splits along surfaces
- Subsurface fissures detected by ultrasonic or radiographic inspection
- Crack propagation from edges, corners, or stress concentration zones
Causes:
Inadequate Forging Temperature
Forging at temperatures below optimal levels reduces ductility. When the material cannot deform plastically, tensile stresses build up and lead to cracking.
Excessive Deformation per Pass
When too much shape change is attempted in one press operation, the material cannot distribute strain uniformly, leading to localized fracture.
High Strain Rate
Rapid deformation leaves insufficient time for material flow. High strain rates aggravate internal stress and contribute to crack formation.
Material Defects
Pre-existing microcracks, inclusions, or inconsistent microstructures act as stress risers that promote crack initiation under load.
2. Laps and Folds

Laps and folds occur when layers of metal roll over and fail to bond properly during deformation. These defects compromise structural integrity because the folded layers are not metallurgically joined.
Typical Signs:
- Surface “creases” resembling paper folds
- Subsurface layers that detach under stress
- Unbonded seams parallel to the rolling or forging direction
Causes:
Surface Contamination
Residual scale, dirt, or oxides on the original surface prevent proper bonding during deformation.
Inadequate Material Flow
Incorrect forging sequences or tooling geometry can push material into folds rather than encouraging continuous flow.
Wrong Temperature at Deformation
Insufficient heat reduces surface plasticity, making the material prone to folding instead of stretching and merging.
3. Internal Voids and Porosity
Internal voids or porosity are empty cavities trapped within the forged part. These pockets diminish load-bearing capacity and seriously degrade fatigue life.
Typical Signs:
- Clustered voids visible in X-ray or ultrasonic scans
- Honeycomb-like internal cavities
- Surface collapse during machining due to underlying holes
Causes:
Entrapped Gas
Gas dissolved in the material during heating can become trapped during cooling and solidification.
Insufficient Degassing
Failure to remove gases from billets or ingots pre-forging leads to trapped pockets.
Cold Work Without Closure
At low forging temperatures, voids may not close completely, leaving gaps behind.
4. Surface Indentations and Marks
Surface defects are relatively easy to spot and may include dents, pits, scratches, or inconsistent surface patterns. These blemishes can compromise finishing, painting, and surface-sensitive assembly.
Typical Signs:
- Shallow dents or dings in the surface
- Long scratches aligned with tooling movement
- Irregular surface texture not consistent with design
Causes:
Contaminated Tooling
Foreign particles between tooling and workpiece leave imprints during forging.
Worn Tool Surfaces
Damaged or rough tooling transfers imperfections onto forged surfaces.
Improper Handling
Material mishandling before or after forging introduces dents or marks.
5. Dimensional Inaccuracy and Geometric
Dimensional inaccuracy occurs when forged parts fall outside allowable tolerances for critical features. This affects assembly, fit, and function and often necessitates costly rework.
Typical Signs:
- Out-of-tolerance diameters and lengths
- Misaligned holes or surfaces
- Inconsistent thickness across the part
Causes:
Die and Machine Misalignment
Even slight misalignment in tooling leads to systematic deviation in shape and size.
Thermal Expansion Effects
Temperature fluctuations during long runs warp tools and affect critical dimensions.
Improper Setup or Fixturing
Inconsistent billet placement feeds into tolerance drift.
6. Warping and Distortion
Warping refers to unintended bending or twisting of parts once removed from the press. This deformation complicates machining and assembly and signals underlying process imbalance.
Typical Signs:
- Bowed or crooked sections
- Twisted surfaces
- Asymmetric deformation relative to intended geometry
Causes:
Uneven Cooling
When different regions cool at different rates, residual stresses cause shape changes.
Asymmetric Loading
Non-uniform die forces introduce bending stresses into the part.
Material Orientation
Incorrect billet alignment alters the flow pattern and encourages distortion.
7. Grain Coarseness and Inhomogeneity
A coarse or uneven grain structure reduces mechanical performance, including fatigue resistance, toughness, and ductility.
Typical Signs:
- Varying grain sizes under microscopic examination
- Localized hardness differences
- Inconsistent response to heat treatment
Causes:
Improper Heating or Soaking
Excessive temperature or uneven heating allows grains to grow excessively.
Rapid or Non-Uniform Cooling
Temperature gradients prevent uniform grain development.
Chemical Composition Variance
Alloy segregation during melting or forging produces local microstructural differences.
8. Inclusions and Non-metallic Impurities

Inclusions are particles of non-metallic material embedded within the metal and act as stress concentration points that significantly reduce mechanical performance.
Typical Signs:
- Dark spots under microscope
- Brittle fracture behavior
- Inconsistent fatigue performance
Causes:
Raw Material Quality Issues
Iron, slag, alumina, and other contaminants from melting are not fully removed.
Melt Handling Errors
Cooling and transfer processes can introduce foreign particles.
Rubbish in Tooling
Residual scale or flake fragments left in dies embed into parts during forging.
9. Overheating and Oxidation
Overheating, often called “burning,” creates a layer of brittle oxide scales and blackened regions that are difficult to remove and degrade surface quality.
Typical Signs:
- Black, scorched surface areas
- Flaky oxide layers
- Darkened or oxidized patches visible to the naked eye
Causes:
Improper Temperature Control
Exceeding the recommended forging temperature accelerates oxidation.
Inadequate Furnace Atmosphere Control
Exposure to air rather than protective gases accelerates surface burning.
Incorrect or Insufficient Lubrication
Inadequate lubricant breaks down at furnace temperatures, allowing oxidation.
10. Residual Stress and Distortion
Residual stress is internal stress retained after forging that can lead to later distortion or premature failure.
Typical Signs:
- Unintended bending during machining
- Cracking during heat treatment
- Unexpected dimensional changes during service
Causes:
Non-Uniform Deformation
Varying strain across the part creates differential stress.
Uneven Cooling Rates
Temperature gradients leave stress locked into the microstructure.
Expert Recommendations to Minimize Defects
Materia Preparation and Quality Control
- Use rigorously tested and clean raw materials
- Apply degassing and descaling before forging
Temperature and Strain Path Optimization
- Maintain uniform furnace temperatures
- Break forging into multiple stages to reduce strain per pass
Rigorous Die Design and Maintenance
- Incorporate proper draft, fillets, and support
- Regularly polish and clean tooling
Real-Time Monitoring and Inspection
- Implement online thermal and force monitoring
- Use non-destructive evaluation techniques (ultrasonic, CT)
- Deploy Statistical Process Control (SPC)
Standardization and Training
- Strengthen operator training on defect recognition
- Standardize procedures to reduce human error
